Ado Net Tutorial Pdf Free Download
The ASP.NET CORE framework defines a number of namespaces to interact with a Relational Database System like Microsoft SQL Server, Oracle, MySQL, etc. Collectively, these namespaces are known as ADO.NET.
In this tutorial, you will learn how to work with ADO.NET to communicate with SQL Server database. First you will learn how to create and open connections to retrieve data, then move on to inserting, updating, and deleting data, followed by examining the topic of database transactions.
Finally, you will use SQL Server's bulk copy feature of ADO.NET, to insert a list of records into the database. So let's get started.
ADO.NET – Connected and Disconnected Environments
You can use ADO.NET in 2 connectional manners, also known as environments, these are:
- 1. Connected Environment
- 2. Disconnected Environment
Connected Environment
A Connected Environment means the application remains connected with the database throughout the whole length of the operation. Here you typically interact with the database using connection, command, and data reader objects.
Disconnected Environment
A Disconnected Environment allows data retrieved from the data source to be manipulated and later reconciled with the database. Here you use DataTables and DataSets, which are client-side copy of external data, to traverse and manipulate the contents.
Both Connected and Disconnected Environments can be used to Create, Read, Update and Delete data in the data source (database).
ADO.NET Data Providers
An ADO.NET Data Provider is used for connecting to a database, executing commands and retrieving results. ADO.NET supports multiple data providers, each of which is optimized to interact with the specific database.
The 4 most common Data Providers in ADO.NET are:
- 1. Data Provider for SQL Server : Provides data access for Microsoft SQL Server Database. It uses the System.Data.SqlClientnamespace.
- 2. Data Provider for OLE DB : Provides data access for OLE DB data sources. These are used to access various COM objects and DBMS that does not have a specific .NET data provider. It uses the System.Data.OleDb namespace.
- 3. Data Provider for ODBC : The ODBC Data Providers are defined within the System.Data.Odbc namespace are typically useful only if you need to communicate with a given DBMS for which there is no custom .NET data provider.
- 4. Data Provider for Oracle : Provides data access for Oracle databases. Uses the System.Data.OracleClient namespace.
Core objects of ADO.NET Data Providers:
| Object | Description |
|---|---|
| Connection | It is used to connect and to disconnect from the database. The base class of all Connection objects is DbConnection class. |
| Command | Executes an SQL Command against a database using connection and transaction objects. The base class of all Command objects is DbCommand class |
| DataReader | It reads a forward-only, read-only stream of data from a database. The base class for all DataReader objects is the DbDataReader class. |
| DataAdapter | Used to populate a dataset or datatable with the data from the database. The base class is DbDataAdapter. |
| Parameter | Represents a named parameter within a parameterized query. The base class is DbParameter. |
| Transaction | It Encapsulates a database transaction. The base class is DbTransaction. |
Note that the specific names of these base classes will differ among data providers. Example – In the case of Connection objects, SqlConnection versus OdbcConnection, each class derives from the same base class DbConnection.
Seeing these names of base classes, you would be correct to assume that after you learn how to work with one data provider, the remaining providers prove quite straightforward.
Important ADO.NET Namespaces:
From a programmatic point of view, the bulk of ADO.NET is represented by a core assembly named
System.Data.dll.

| Namespace | Description |
|---|---|
| System.Data | This namespace defines the core ADO.NET types used by all data providers. It is the lowest common denominator and contains types that are shared among all ADO.NET data providers, regardless of the underlying data store. You cannot build any ADO.NET applications without specifying this namespace in your data access applications. |
| System.Data.SqlClient | This namespace is the .NET Data Provider for SQL Server. It gives you easy access to the SqlConnection, SqlCommand and other SQL classes. |
| System.Data.Sql | This namespace contains types that allow you to discover Microsoft SQL Server instances installed on the current local network. |
As you know that there is large number of ADO.NET data providers, in this tutorial I will use the Microsoft SQL Server data provider (System.Data.SqlClient.dll). Recall that this provider allows you to communicate with Microsoft SQL Server, including SQL Server Express and LocalDb.
Entity Framework Core is an Object/Relational Mapping (O/RM) for doing database operations. After completing ADO.NET I would recommend you to learn EF Core also.
If you intend to use ADO.NET to interact with another type of database, you should have no problem doing so once you understand the material presented in the topics that follow.
Creating a Company Database
For communicating with a database, create a new database called Company in my SQL Server. This database will contain a table called Inventory.
You should have SQL Server "Evaluations" edition installed in your PC – Download Link. In place "Evaluations" edition you can use the Developer and Express editions of SQL Server which are free to use – Download SQL Server Express LocalDB.
You should also download and install SQL Server Management Studio (SSMS), which can be downloaded from – Download.
Connecting SQL Server
There are 2 ways to connect SQL Server. You can use any of them. These ways are:
- 1. SQL Server Object Explorer in Visual Studio
- 2. SQL Server Management Studio (SSMS)
SQL Server Object Explorer
The SQL Server Object Explorer can be opened from the View ➤ SQL Server Object Explorer in Visual Studio.
When SQL Server Object Explorer window opens, right click on the SQL Server node and select Add SQL Server.

Next, a Connect window opens up. In this window, select the Browse tab then click on the Local node to open it.
Inside this node, select the 2nd option that says (localdb)\MSSQLLocalDB. After selecting it, you will notice the Server Name: field, in the same window, now has the (localdb)\MSSQLLocalDB value.
Now you have to simply click the Connect button to connect to the SQL Server. See the below image:

In a few seconds time the SQL Server will be connected and ready to use.
SQL Server Management Studio (SSMS)
Another way to make a connection with SQL Server is through SQL Server Management Studio (SSMS). First open the SSMS installed in your PC. Then in the Object Explorer window (opened from View ➤ Object Explorer), click the icon that says Connect Object Explorer (opened from File ➤ Connect Object Explorer).
You will see Connect to Server window being opened up. In this window, you enter (localdb)\MSSQLLocalDB for the Server name.
Also make sure that Server type is selected as Database Engine, and Authentication is selected as Windows Authentication. This is shown in the below image:

Next, click the Connect button to connect to the SQL Server. The connection will be made in 1 or 2 seconds only, and after this you can create your database in SQL Server.
Company Database
I use SQL Server Object Explorer in Visual Studio to create the database, tables and other things in my SQL Server. So after connecting with the SQL Server, right click on Databases node and select Add New Database
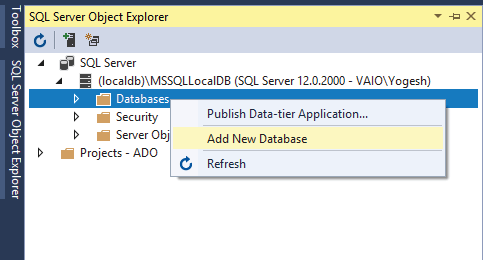
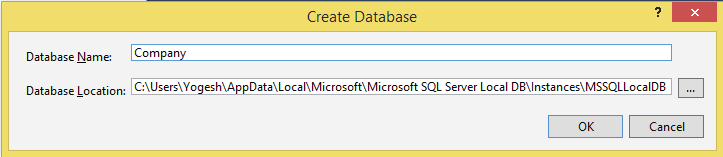
In the resulting dialog, enter Company as the database name and click OK to create the database.
The database is created but is empty. So now I will first create the Inventory table.
Click the ► sign given in front of Company database name to open it.
Next, right click on the Tables node and select Add New Table.
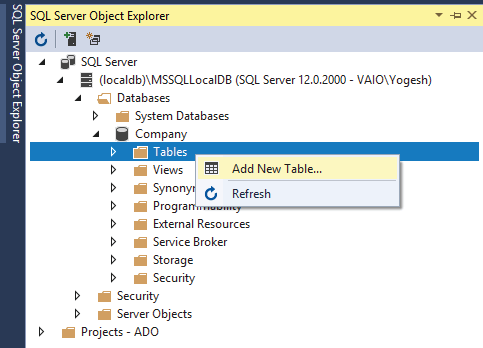
A Table Design Window will open up in the Visual Studio. Here you can add the fields for the Inventory table.
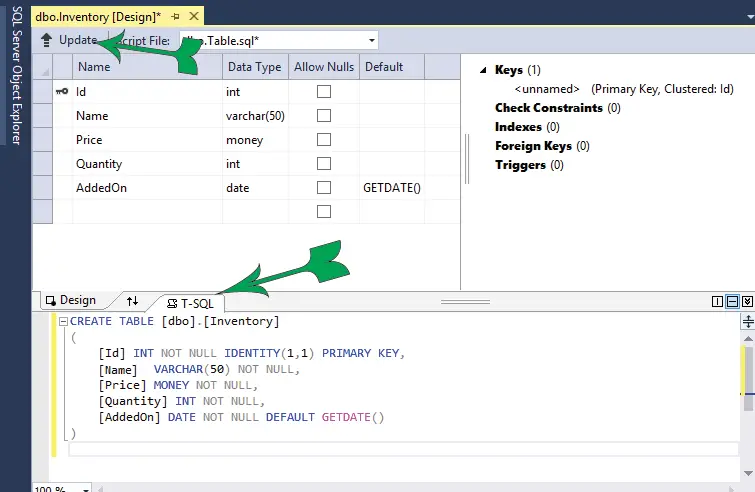
In this window, inside the T-SQL tab you can enter the below script to create the 'Inventory' table:
CREATE TABLE [dbo].[Inventory] ( [Id] INT NOT NULL IDENTITY(1,1) PRIMARY KEY, [Name] VARCHAR(50) NOT NULL, [Price] MONEY NOT NULL, [Quantity] INT NOT NULL, [AddedOn] DATE NOT NULL DEFAULT GETDATE() )
Next, you click the Update button to start the creation process, see the below image which explains this:
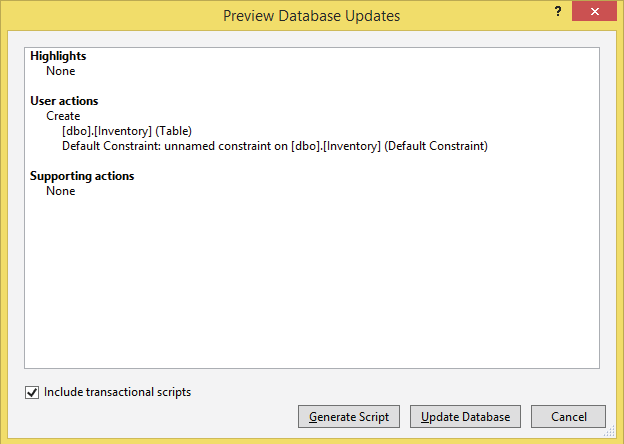
You will get a new dialog box called Preview Database Updates. Here click the Update Database button and within a few seconds the Inventory table will be created.
Understanding the Inventory Table Script
In the Inventory table there are 5 columns which are Id, Name, Price, Quantity, & AddedOn. All these columns are provided with their data types just next to them. Like INT for Id column, VARCHAR(50) for the Name column and so on. These are listed below.
INT --> for integer values like 1,2,100 VARCHAR(50) --> for strings up to 50 characters in length MONEY --> for numeric values of 4 decimal place like 20.5000, 5.4999 DATE --> for date values like 11-20-2018 All these 5 columns are also forced to contain at least some value of their given type. This is done by using the NOT NULL keyword.
Now see the Id column definition which is:
[Id] INT NOT NULL IDENTITY(1,1) PRIMARY KEY
I have stated it to be a primary key by using the PRIMARY KEY keyword. That means all Ids will be unique and there can be no two Ids in the table with the same value.
The keyword IDENTITY(1,1) is used to perform an auto-increment feature. So the starting value for the Id column is 1, and it will increment by 1 for each new record.
Now see the AddedOn column whose definition is given below:
[AddedOn] DATE NOT NULL DEFAULT GETDATE()
It is given a keyword DEFAULT GETDATE() to specify a default value of current system date in YYYY-MM-DD format for every AddedOn column's value.
Create an Example Project
You are now ready to create ADO.NET Codes for database management. So first create a new project in Visual Studio by going to the File ➤ New ➤ Project link.
Next, you will see the New Project dialog.

Here select ASP.NET Core Web Application which has the options of C#.
Next you have to Configure your new project. So provide some name to the project and select the location on your drive where you want this project to be created.

Click the Create button to continue.
You will reach a new page which says – Create a new ASP.NET Core web application. Here you have to select the framework, template and authentication.
Ensure that .NET Core and ASP.NET Core 3.1 are selected from the drop-down menus, select Empty template for the project.

Also make sure the Authentication is No Authentication and Enable Docker Support option should be un-checked. Finally click the Create button to create your project.
With the project created I need to add the Models, Configuration, Views and other things required for an ASP.NET Core MVC project to run. Follow the below section to do these.
Model
Create a new folder called Models on the root of the project and add a class called Inventory.cs whose code should be like given below.
using System; using System.Collections.Generic; using System.Linq; using System.Threading.Tasks; namespace ADO.Models { public class Inventory { public int Id { get; set; } public string Name { get; set; } public decimal Price { get; set; } public int Quantity { get; set; } public DateTime AddedOn { get; set; } } } Configuration
Go to the Startup.cs class and add the necessary services and configurations as shown below:
using Microsoft.AspNetCore.Builder; using Microsoft.AspNetCore.Hosting; using Microsoft.Extensions.DependencyInjection; using Microsoft.Extensions.Hosting; namespace ADO { public class Startup { public void ConfigureServices(IServiceCollection services) { services.AddControllersWithViews(); } public void Configure(IApplicationBuilder app, IWebHostEnvironment env) { if (env.IsDevelopment()) { app.UseDeveloperExceptionPage(); } else { app.UseExceptionHandler("/Home/Error"); app.UseHsts(); } app.UseHttpsRedirection(); app.UseStaticFiles(); app.UseRouting(); app.UseEndpoints(endpoints => { endpoints.MapControllerRoute( name: "default", pattern: "{controller=Home}/{action=Index}/{id?}"); }); } } } Controller
Create Controllers folder on the root of the project and add a new Empty controller called HomeController to it.
The controller will be created with the initial code as shown below:
using System; using System.Collections.Generic; using System.Linq; using System.Threading.Tasks; using Microsoft.AspNetCore.Mvc; namespace ADO.Controllers { public class HomeController : Controller { public IActionResult Index() { return View(); } } } Bootstrap
I will use Bootstrap for providing better designs to my views. So install Bootstrap inside the wwwroot ➤ lib folder. I have written a separate tutorial called How to Install Bootstrap Package in ASP.NET Core Application in Visual Studio.
_ViewImports.cshtml
Create Views folder on the root of your project and add _ViewImports.cshtml file inside this folder.
Add the following code to it. This code will import the Tag Helpers and Model namespaces for the view files.
@using ADO.Models @addTagHelper *, Microsoft.AspNetCore.Mvc.TagHelpers
Adding Database Connection String
A Database Connection String stores the parameters that are required to connect the application to the database. These parameters are the name of the driver, Server name and Database name. It also contains security information such as user name and password needed for database connection.
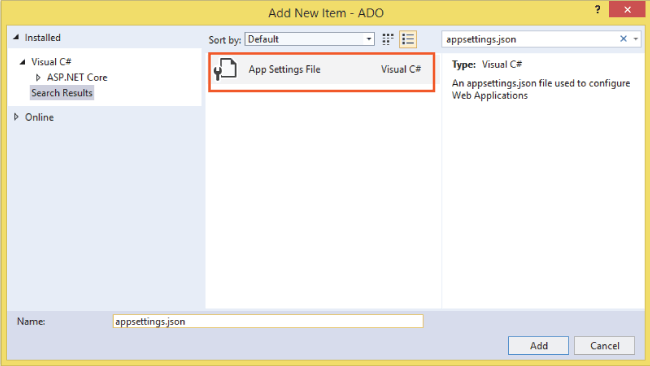
I will store the connection string inside appsettings.json file. This file resides on the root of the project. If your project don't have it the you need to add it to your project.
To add appsettings.json file, right click on the project name in the Solution Explorer and select Add ➤ New Item. Then in the Add New Item dialog, select App Settings File, this file will have the name as appsettings.json (see below image). Finally click the Add button.
The file will be created and open up for editing in Visual Studio. Add the below connection string to it:
{ "ConnectionStrings": { "DefaultConnection": "Server=(localdb)\\MSSQLLocalDB;Database=Company;Trusted_Connection=True;MultipleActiveResultSets=true" } } You can clearly see that I gave the connection string value for the DefaultConnection node. The following parameters are specified:
- Server – (localdb)\\MSSQLLocalDB. It specifies the name of the SQL Server instance the application will be connected to.
- Database – Company. It specifies the name of the database, contained by the SQL Server instance, to which the application will connect.
- Trusted_Connection – True. It specifies that the Windows credentials of the current user are used to authenticate against the SQL Server.
- MultipleActiveResultSets – true. It is an optional parameter and you are free to remove it. Multiple Active Result Sets (MARS) is a feature that works with SQL Server to allow the execution of multiple batches on a single connection. It's a sort of performance enhancing technique.
If you don't want to use Trusted_Connection=true, you need to specify user id and password (of the SQL Server instance) explicitly in the connection string, and leave out any reference to Trusted_Connection. This is used in production scenario when we make the website live on the internet.
Understanding SqlCommand Object
The SqlCommand class which derives from the DbCommand class is used to submit and run SQL Queries to the database. You can specify the type of the command using the CommandType property, which can take any value from the CommandType enum.
public enum CommandType { StoredProcedure, TableDirect, Text // Default value. } When you create a SqlCommand object, you can establish the SQL query as a constructor parameter. Also when you create a Sqlcommand object, you need to specify the connection you want to use. For this, you can do so as a constructor parameter.
Consider the code snippet where I have created a SqlCommand object by providing the SQL Query and the connection to it's constructor:
string connection = "Server=(localdb)\\MSSQLLocalDB;Database=Company;Trusted_Connection=True;MultipleActiveResultSets=true"; string sql = "Select * From Inventory"; SqlCommand myCommand = new SqlCommand(sql, connection);
Note that in the above code I just added the connection string to a string variable ('connection' in this code). But in my application I will fetch the connection string from appsettings.json file. I will show how to do this when I will Create Inventory records in ADO.NET, in the below section.
Kindly note that, at this point, I have not literally submitted/executed the SQL query to the database but instead prepared the state of the SqlCommand object for future use.
There are 3 methods of SqlCommand object that submit and run the SQL Queries. All of these 3 methods needs an open state of the SqlConnection object in order to execute the query. These are listed in the below table:
| Name | Description |
|---|---|
| ExecuteReader() | Executes (runs) a SQL query and returns the data provider's SqlDataReader object, which provides forward-only, read-only access for the result of the query. |
| ExecuteNonQuery() | Executes a SQL nonquery (e.g., insert, update, delete, or create table). |
| ExecuteScalar() | A lightweight version of the ExecuteReader() method that was designed specifically for singleton queries (e.g., obtaining a record count). |
In this code snippet I am executing an SQL query using the ExecuteNonQuery method.
string connection = "Server=(localdb)\\MSSQLLocalDB;Database=Company;Trusted_Connection=True;MultipleActiveResultSets=true"; string sql = "Select * From Inventory"; SqlCommand myCommand = new SqlCommand(sql, connection); //opening connection and executing the query connection.Open(); command.ExecuteNonQuery(); connection.Close();
There are also other important members of SqlCommand object that are listed in the below table:
| Name | Description |
|---|---|
| CommandTimeout | A property to 'get or set' the time to wait while executing the SqlCommand before terminating the attempt and generating an error. The default value is 30 seconds. |
| Connection | A property to get or set the SqlConnection used by the SqlCommand. |
| Parameters | A property to get the collection of SqlParameter objects used for a parameterized query. |
| Cancel | A method to cancel the execution of the SqlCommand. |
Now you are ready to use SqlCommand class to insert records into the database table.
Download the source codes:
Download
Conclusion
I hope you liked this tutorial on ADO.NET. In the next tutorials I will start building CRUD features using ADO.NET in my application.
Source: https://www.yogihosting.com/ado-net-aspnet-core/

Post a Comment for "Ado Net Tutorial Pdf Free Download"